Thursday, 9 March 2023

How to crochet a Binary Foundation Double Crochet row ... also called a binary cord (bfdc UK terms)

Allow me to show you to two items I have crocheted using something I'm calling "binary crocheting". I had an "I wonder what happens" moment a few months ago and have been experimenting with the results ever since. I'm not sure whether this has been documented before, someone else must've had the same idea in the past but I've never seen it in crochet magazines, online tutorials or any of the patterns I have used. This ear warmer/headband and long scarf were the result!

It's tricky to define it but here goes .... (UK crochet terminology is used throughout)

Binary crocheting is a way of crocheting using two colours in every row. The two colours aren’t used doubled throughout your work but neither are they carried behind. You don’t need bobbins of yarn either. One colour is kind of partially crocheted over, combined with yarn overs.

Different effects can be achieved by varying which colour is dominant and the number of rows where one colour is dominant over the other.

It sounds complicated but it really isn't, it's easy - and fun - to learn You'll understand more when you actually do it!

This tutorial shows you how to make a binary foundation double crochet row, step by step with detailed photographs. The binary double crochet foundation row is how both of the above two designs (ear warmers and a scarf) are started. 

This technique creates the chain start *and* the first row of double crochet at the same time. There will be another tutorial soon showing how to continue to do your follow on rows.

The yarn used in this tutorial is DK weight and the hook is 6mm (J/10). Ordinarily I would use a 4mm (G/6)  hook for DK weight yarn. For binary crocheting, it is recommended that you use a size of hook at least one size up from that recommended for the yarn, perhaps two for yarns thicker than 4-ply. 

You will need:
  • Two differently coloured yarns which show up well against each other.
  • Crochet hook at least one size larger than you would normally use for the yarn weight, two sizes for thicker yarn. Here I have gone with a 6mm instead of 4mm.
  • Blunt darning needle
Step 1:
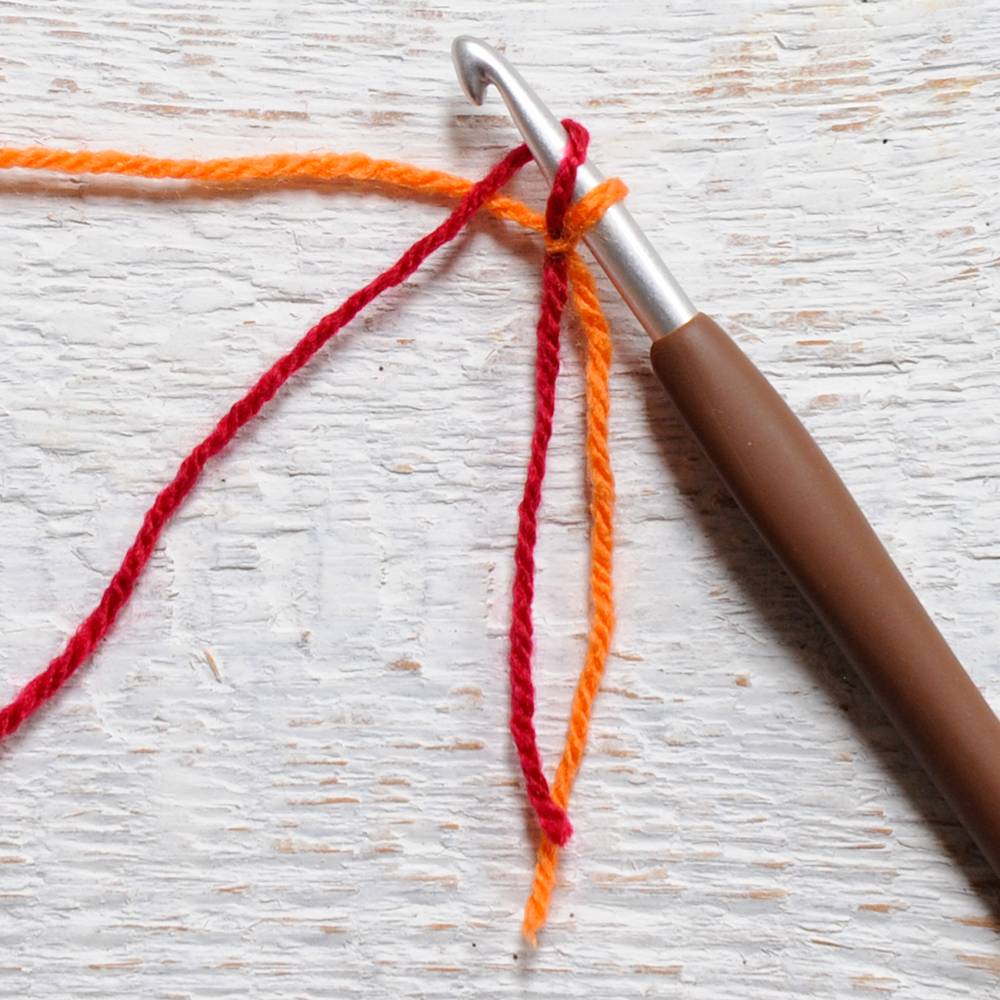
With two colours of yarn held together, make a slip knot.

Don’t make the slip knot too tight, we will be unpicking it at the end of the row.
Step 2:
In this example, orange is referred to as the “dominant colour” and red as the “supporting colour”.

Leave the tails of the yarn dangling down, pull the supporting colour (from the red ball of yarn) so the loop shrinks and eventually disappears, leaving only the dominant colour loop remaining
Step 3:
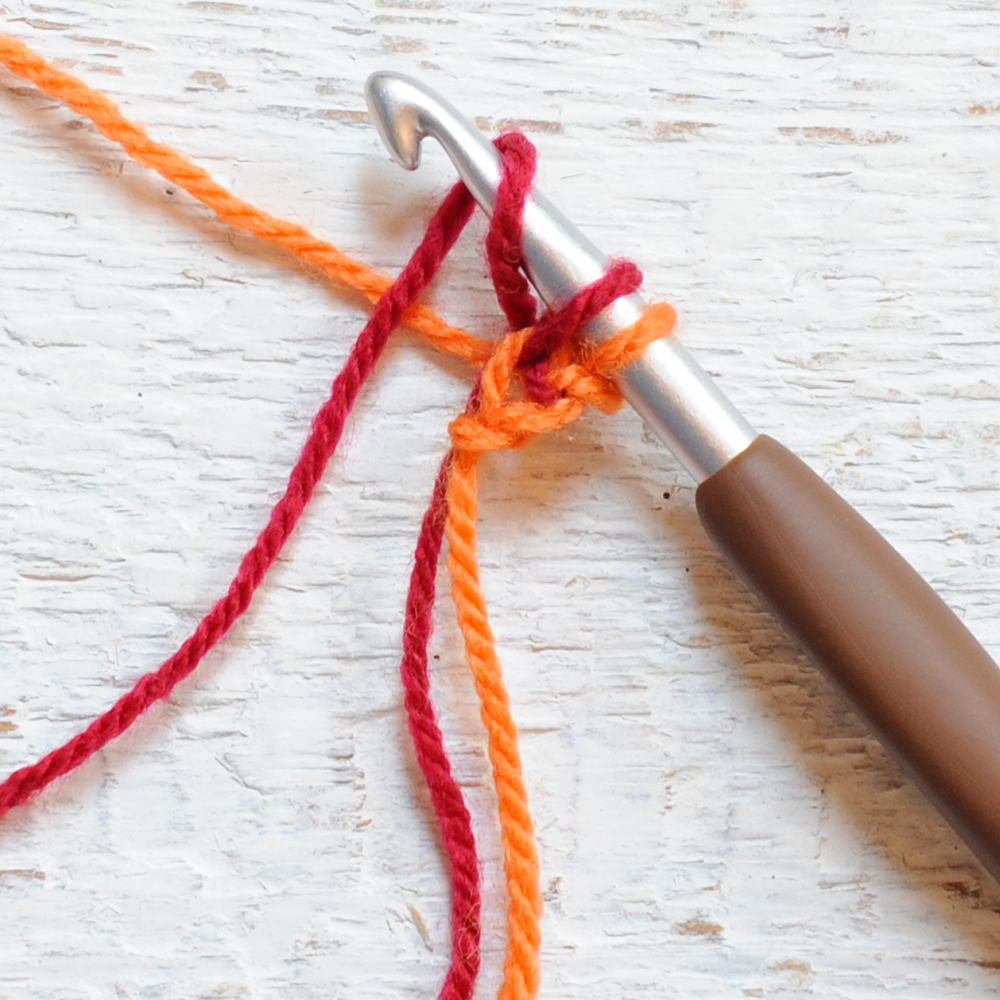
Place remaining loop on hook and tighten the dominant colour so it sits on the hook neatly – remember not so tightly that it will be difficult to undo later. Be careful about tugging on the supporting colour, if you pull on it too much, it will come off!

Re-arrange your working yarn (from the balls of yarn) so the dominant colour is on top of the supporting colour and two yarn tails left hanging below.
Step 4:
With supporting yarn, yarn over from below hook going from front to back. The supporting yarn should end up in front of the dominant yarn.
Step 5:
With dominant colour, yarn over from above hook going from back to front.
Step 6:
Pull the dominant coloured loop through two loops. One binary chain completed. (One loop on hook).
Step 7:
Repeat steps 4-6 once. Two binary chains completed. (One loop on hook)
Step 8:
Insert hook into two loops of the first binary chain (one of each colour). (Three loops on hook)
Step 9:
With supporting yarn, yarn over from above hook going from back to front.
Step 10:
Pull supporting colour through first two loops only. (Two loops remaining on hook)
Step 11:
With supporting colour, yarn over from below hook going from front to back.
Step 12:
With dominant colour, yarn over from above hook going from back to front.
Step 13:
Pull dominant colour through first two loops only (two loops remaining on hook)
Step 14:
With supporting colour, yarn over from below hook going from front to back.
Step 15:
With dominant colour, yarn over from above hook going from back to front.
Step 16:
Pull dominant colour through all three loops (one loop remaining on hook)
Step 17:
Insert hook into two loops (both supporting colour) of the stitch below the current stitch
Step 18:
Repeat steps 9 to 17 for as many times necessary to produce the number of stitches desired, ending on Step 16.

The photographs will not match on the next run through but follow the written instructions exactly and you will end up with a binary double crochet foundation row like the one in the photograph.

Step 19:
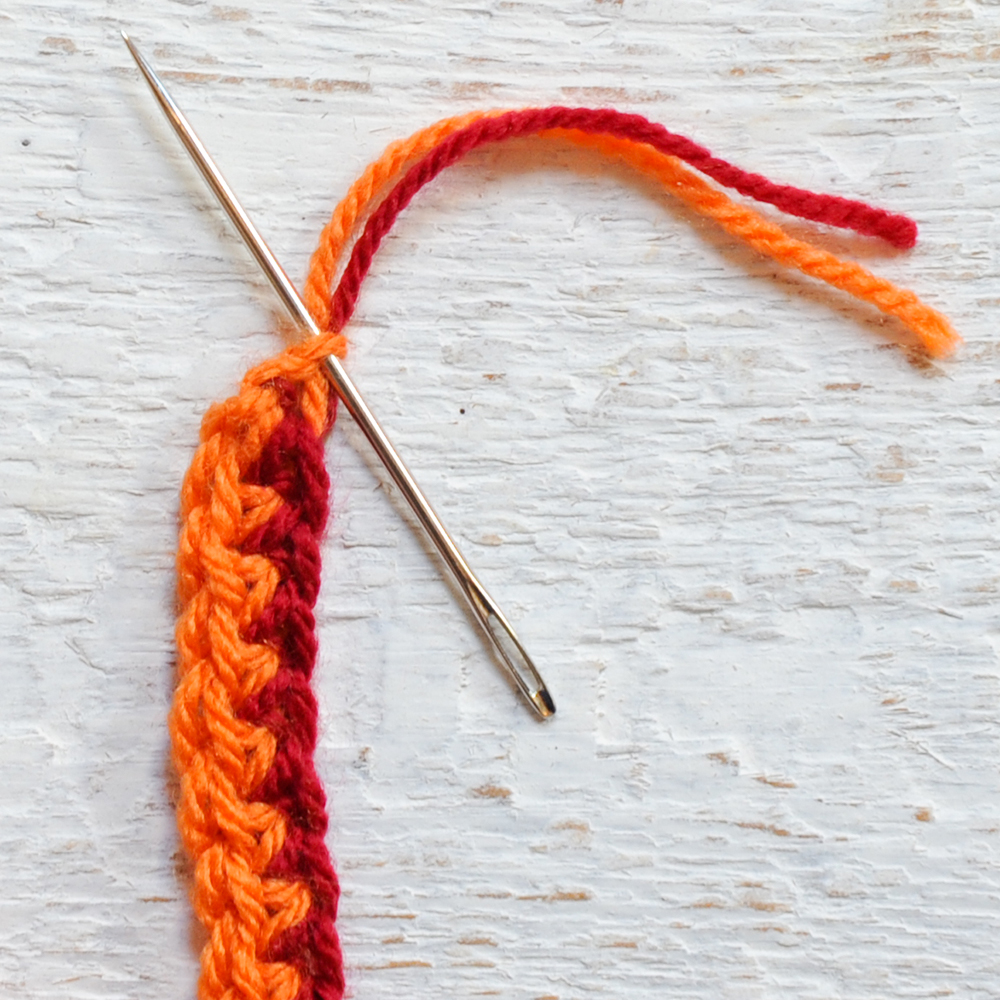
To neaten the beginning of the binary foundation double crochet row, we’re going to unpick the slip knot made at the beginning of the row.

Insert a blunt darning needle into the small dominant coloured loop at the tip of the beginning of your work (as indicated in the photograph)
Step 20:
Carefully pull on the loop to enlarge it, keep pulling until the end of the yarn runs through the loop.
Step 21:
Give both yarn ends a gentle tug to resettle and neaten up.

VIDEOS

Steps 1-17

Step 18

Steps 19-21

Please see the following tutorial "Binary Double Crocheting" CLICK HERE for instructions on making the follow on rows. Once you've learnt how to do the rows, you will be able to make both the ear warmer/headband and scarf too.

Print-friendly and US terms versions of the the patterns are available as downloadable PDFs in my Etsy shop, CLICK HERE to visit. 


Tuesday, 15 November 2022

Braided Little Squares Scarf - today is the day!


Hello to blog readers old and new! I'm so happy to tell you my design was voted to be shown eighth (out of a total of 26 submitted) by the readers of CAL - Crochet A Long Facebook Group CLICK HERE to visit, and today is the day I get to show it off to you!

As promised - for a short time - the pattern is available to be downloaded for free. This link to it will expire on 23 November so click HERE to download my Braided Little Squares Scarf pattern without delay!

It's written in UK terms, uses the overlay mosaic crochet technique and has photos showing how to construct the special stitches needed and the fringe. A chart is provided for those who prefer to crochet from them.

The pattern has been thoroughly tested by a super group of volunteers. I was particularly pleased that three of my testers Susan, Mum and Shazia had never worked on an overlay mosaic crochet pattern before so it was great that they all managed to produce beautiful scarves as you can see below.

I've used Stylecraft Highland Heathers for mine, this is a Double Knitting weight yarn but my testers used lots of different yarns (detailed below). 

After the 23 November, the pattern will be available for a modest fee in my Etsy shop click HERE in UK terms. At that time, a US version will also be available. 

The design works well with solid colours as well as self-striping yarns with longer lengths. Variegated yarns (like those used for fair isle effect or having short colour changes) should be avoided for this design. 

Extra special thanks to Laurene Leeseberg Bluder and Silke Karp who were always available with help on the administration and overall organisation of the whole event. This design wouldn't exist without them. They work awfully hard in the background.

I leave you with photographs from my wonderful testers in no particular order other than how they arrived in my inbox. They said some lovely things about the pattern, which modesty forbids me to repeat here, but you can read what they had to say about the design on the CAL - Crochet A Long blog posting, click HERE.

Susan Powell

Used Crafty DK in Deep Lake and Cream purchased from Aldi. Strong contrasts work so well in Susan's gorgeous scarf.


Elaine Tuttle Shrock

Used 6 oz of Premier Anti Pilling DK in Meadow, 4.5 oz of Loops & Threads Joy DK in Snow. What an elegant scarf Elaine has created! 


Karen Dixon 

Used Cygnet DK, a truly gorgeous combination of Candyfloss and Chiffon. I just love pink and grey together! 


Tammy Alexander, unfortunately unable to finish her scarf due to circumstances outside her control but she made some fantastic observations on the pattern which will benefit everyone using the pattern in the future so she deserves big thanks and credit for her contribution.

Jamie Storer

Used Lion Brand Wool-Ease in Bedazzles and part of a Mega Ball DK from Hobbii in black. I think this yarn was made for this design, Jamie's scarf is so striking.


Anya Roche 

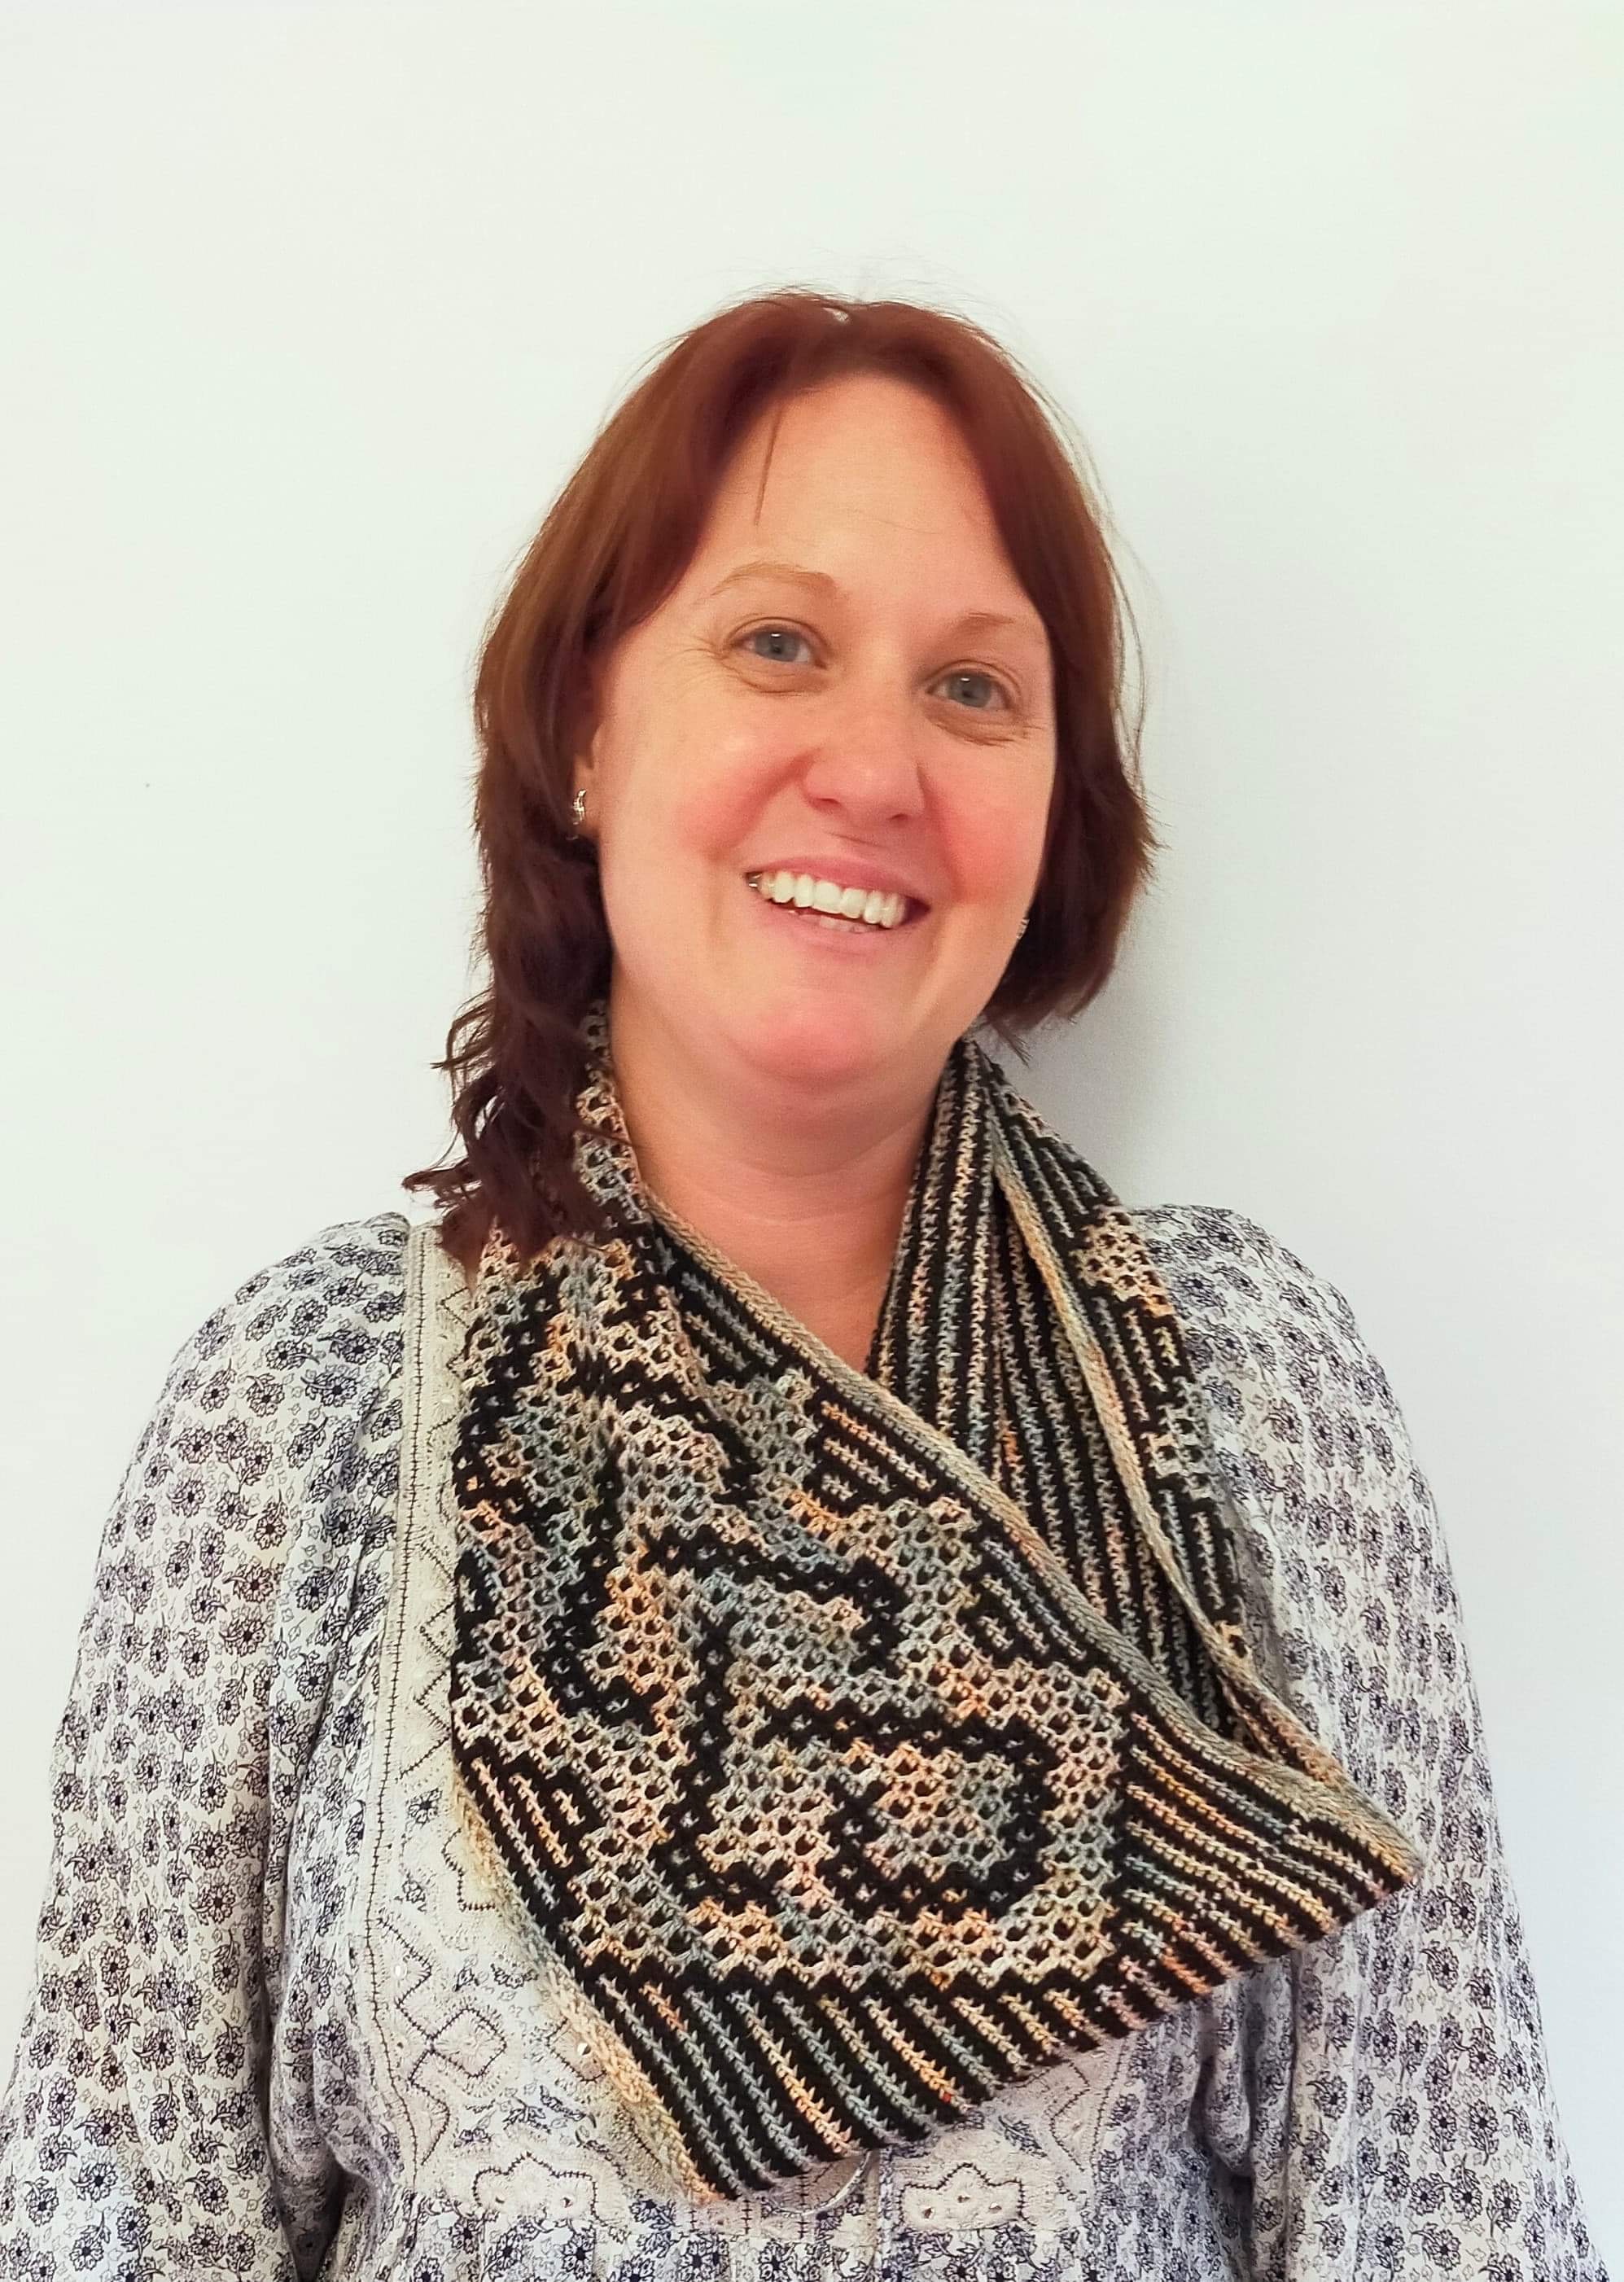
Used Nani’s Yarns 4 ply Mulberry Silk in colourways Peach to soft green, and 3-ply Merino silk in Black. As these yarns are thinner than DK recommended in the pattern, she went down to a 3.25mm hook.

Anya had her friend, Aleashia, model her creation. Very cleverly, she used fewer repeats and joined it in the round to make this wonderful cowl. 

It was a little bit big for Barry, the dog :-) Awwww, isn't he beautful though? 


Malathi Seshandra

Used Premier Luna and Cascade yarn. Another self-striping yarn used to great effect in Malathi's scarf.


Mum Taylor

Used Stylecraft Special DK in Teal and White, great contrast here again with bold colour blocks


Shazia Suhail

Sunshine colours will cheer up the greyest of winter days, a bright and fun combination.


Thanks again to all my testers for taking part in this, and the administrators behind the Facebook Group, it was a wonderful experience working with you all! The whole experience has been an utter joy.


Monday, 17 October 2022

Voting has opened on the Design-a-Scarf 2022 Challenge!

Voting has opened, for the Design-a-Scarf 2022 Challenge!

There is a blog post from the organisers CLICK HERE where the background to the Crochet A Long is outlined and all the scarf designs are featured. Each design has got a number, make a note of your favourites!

There are two ways to vote for which designs you want to see published first.

In the CAL - Crochet A Long album CLICK HERE, you can click "Like" against each of the scarves, there's no upper to limit to the ones you can click Like against, you can vote for them all if you want to! 

In the CAL - Crochet A Long Poll CLICK HERE, you vote for only one - your top favourite.

I'm not allowed to tell you which one is mine. Shortly after voting ends (on Sunday 23rd October), a schedule for the release of the patterns - and the names of the designers - will be issued. Most votes gets released first. My understanding is a few will be released each week. The designs will be free to download for the duration of the Crochet A Long so make a note of the ones you like, not all of them will be free when the CAL ends. 

It's a design challenge, not a competition - everyone is a winner, they are all lovely - so do please go take a look and join in on the voting. 

I feel honoured to be amongst such a great selection of scarves. 

Thursday, 13 October 2022

Scarves galore!


This week, I have been perfecting this scarf, the stitch is a kind of hybrid between crocheting with two strands of yarn on your hook and 2-cord chaining. I've been working hard on a tutorial on how to do it along with a few variations. 

The pattern and tutorial will be coming (free!) to a blog near here very soon. Print-ready versions will be available in my Etsy shop for my usual modest fee.  

Last week, (and for the three weeks before that actually!) I was working very, very hard on a Facebook Design a Scarf 2022 challenge.  Along with several other designers, we were challenged to come up with a new design in a very short period of time! Mine has been accepted and tested and is now ready for the exciting unveiling. 

When the challenge goes live, I will need your help ... there will be a vote, if you like my design and want to see it sooner than everyone else's, you can help the unveiling along by voting for it. To get a head start, you need to first join the Facebook Group CAL - Crochet A Long (CLICK THESE WORDS TO VISIT IT). The scarves will be unveiled there and voting will begin.

I can't show you my design or say any more about it at the moment but I will be back in a few days with more details!

Thursday, 6 October 2022

Have a Cool Yule pattern - time to crochet Christmas blankets - Oh Yes It Is!


I know it's not Christmas yet but bear with me, us crocheters take weeks to make a blanket and so I'm getting in a bit early.

The pattern for my "Have a Cool Yule" Christmas blanket is available in my Etsy shop now. It uses the mosaic overlay technique. I've used Stylecraft Special DK to make the one photographed. If you want to make one exactly the same you will need:

  • 3 x 100g 1123 Claret
  • 3 x 100g 1001 White
  • 2 x 100g 1725 Sage
  • 2 x 100g 1009 Bottle
  • 1 x 100g 1807 Hint of Silver

Happy crocheting!