Friday 13 December 2019

Things for Room 101

Today I am feeling grumpier than usual so I'm just going to talk about lots of things that get on my nerves and get it all off my chest once and for all. These are first world problems, I know overall I'm very fortunate, but seemingly little things are bugging me and I'd like put them all in room 101, please.

Cards with glitter on them (or more often NOT stuck on them). Not only is it environmentally unfriendly as it's plastic but this stuff gets everywhere, when you think you've dusted and hoovered it away, more appears out of thin air. It breeds like tribbles and pine needles. I have been known to buy them myself but only to avenge myself on those who have sinned against me. A self-perpetuating problem, if I stopped.. would they?

Coat hangers; these things are evil triangles of exasperation. Even on their own they try your patience. Three or four tangled together are a menace to sanity. I quite like ironing, I really don’t mind doing it at all, especially if I can do it in between points during a televised tennis match but dealing with the coat hangers spoils it.

Packaging that is too tall to fit in your cupboards. The worse ones are where the supermarket gives you 20% free and you can't buy the proper sized ones til the promotion is over. Just reduce the price instead! 

Modern plugs. Both the moulded ones with an integral cable and the upside down ones which have transformers atrached. I live in an old house, many of the sockets are just above the skirting board and hence they only just go in, leaving a little gap. When I'm vacuuming carpets or steaming the kitchen floor, when the extent of the cable is reached, it pulls out very easily. Some sockets in my house cannot be used at all. The house was designed for the old style plugs which you could rewire yourself. It's a safety thing I guess, to stop people who didn't do it right from electrocuting themselves; all I can say to that is they clearly deserved it, Darwinism in action. 

Pump action dispensers that don't go right too the bottom of the container. The see thru ones add insult to injury as not only can you feel the weight of the product you can't get at, you can SEE it as well! When you complain to the manufacturer, they say they put more in the container to make up for it. This just annoys me more, they KNOW about it, don't solve it AND are deliberately wasteful.

Ansaphones that beep incessantly until you listen to the message. You can hear it nearly everywhere in the house. What's wrong with just a discreet flashing light I can check as and when I'm ready to see if anyone needs me? My other half is also irritated by it but he thinks you have to delete the message as well as listen to it to make it shut up. So he’ll tell me, “so-and-so left a message for you” so I go to listen to it but it’s gone! 

Cheese that sticks to the knife when you try to slice it for a sandwich. 

Strangers in the street who tell you to "cheer up".

Clothing labels that itch the back of your neck. Don't the people who design/manufacture clothing wear their own brands?

People with limp wristed knocks that are so quiet you can't hear them. I have a doorbell ... why wouldn't you use it? It's a good job I have a dog or I would never get any of my packages. Supermarket drivers are the worst. If there was some way to make my door knocker activate a really annoying beep like my ansaphone so I don't miss packages (or my food delivery) that would be great. 

Labels on wine bottles and attractive glass jars that you can't remove by soaking in water.

Things left in the sink. If you're not going to put them in the dishwasher or wash them up yourself, then leave them on adjacent work surfaces, that is a better option. It drives me nuts to have to remove things from the sink before washing an apple or emptying out the dog's water bowl to put fresh in. WORSE are things that are left in the sink which have cold clammy water on top of them on the pretext they're "soaking". Never has my fellow house inhabitant ever removed such an item a little later, if he did, maybe he would realise how unpleasant it is. I can only assume this affrontery is a message "I can't be bothered to wash this, it's quicker to just cover with water and ABANDON it." I have to put my hand into scummy, yukky cold water to take it out ... yuk!

Thunder flies.

Man-sneezes exaggerated for effect and far louder than is strictly necessary. Imagine you were escaping from a murderous assassin (not me, obviously I wouldn't murder anyone JUST for sneezing ...) If you really, really HAD to sneeze in your hiding place, wouldn't you TRY to do it quietly?

I realise it should only be three things but it’s my blog, my rules. If you have a problem with that, I'll just have to put you in Room 101 as well.

Tuesday 3 December 2019

Can I learn to love my mobile phone?


I have to have a mobile phone because I'd never go out in my car without the reassurance that I can summon help. I am a very anxious "what-if-what-if" kind of person. I worry about everything, I need props, back-up procedures and detailed planning before doing many things. I've even needed professional help with anxiety which - at times - paralyses me into inaction. So you see, I have to have one. I wish I didn't.

Anyway, that's the only good thing about a mobile phone, it stops me worrying about breaking down or being in an accident. Reasons to detest and loathe it are multitudinous.

Every time I upgrade to a new phone (3 times) the new one has been worse than the one before. In hindsight, my first clunky, chunky Nokia from 1997 is recalled now with great fondness; all the reassurance it gave me. Getting texts out of it was a hit and miss affair, but the battery would last nearly a week if I didn't use it.

The one I have now runs out of charge 18 hours even if I haven't used it for anything other than checking the date (like once). 

When its battery is depleted (which is always), I have to wait til it's got 3% power before it will switch back on. Even though it's plugged in, with the entire national grid's electricity supply at its disposal, I cannot get a phone number out of it.

When I'm in poor reception areas, my phone remembers and when I've moved to a place where I know reception is good, I have to turn it off and on again before it realises it can work again.

When it got lost at a gig, I rang O2 and they deactivated it for me. Thankfully, I got it back from the venue. I expected to have to reactivate it but no, it just worked ...?! 

It won't fit into the front pocket of my jeans, only the back, I forgot and accidentally sat on it so the screen has had a crack for weeks but it still works (something else in it's favour I grudgingly accept). I need to upgrade but I can't go back to the shop where I got this one. 

Once I finished paying for it and my contract expired, O2 in Stamford have never left me alone. Constant messages, texts and phone calls asking me to ring them as they have "important information about my account" which I ignored.

Recently, I went for a routine hospital screening appointment with a dangerously low charge (as usual). My lift was picking me up at the point he dropped me off but somehow, after the appointment, I'd come out of the wrong exit in another part of the hospital; I had no idea where I was. 

Panicking a little bit, I got my phone out to ring him to say I'd be a bit longer but as I did, it rang. I answered, thinking it was my rescuer, the knight in shining armour and all round wonderfulness that is my husband. Instead, I got the O2 shop ... I kind of exploded at them about, well everything. How dare they use up my charge, I told them I would never ever spend another penny in their shop, this phone is for my convenience not theirs and to stop hassling me. And I did it in an extremely loud voice. They haven't bothered me since.

Now I'm very interested in photography, and I know a few people who can take really wonderful photos on their mobile phones, I have been wondering about getting a mobile with a good camera. I've been looking into what settings you can change on a mobile phone and the reviews say the macro settings on the latest models rival a dSLR. I was hoping for a macro lens for my Nikon D700 for Christmas but I'm thinking I might just ask Santa for a new mobile phone instead. Given all my previous rantings about my mobile, Santa will think I've gone mad.

If I do go for a new mobile, all I have to do is find an iPhone shop that will have me, grumpy, negative, middle-aged luddite that I am.

PS, I like how my mobile phone links up with my beloved iPad but THAT's it, there are no other good things about it.

Wednesday 30 October 2019

I've got photographer's knee!

In early September, I started a weekly on-line photography course called A Year With My Camera by Emma Davies. I've completed part 1 (6 weeks). I'm thoroughly enjoying the course and I've learnt loads about photography. I highly recommend it to beginners and anyone who wants to fill in any gaps in their photography knowledge. 

Here's one of the shots I took for week 2's homework about aperture priority.

Chessmen on a chessboard with only a pawn and a knight in focus

There's only one problem .... photographer's knee ... investigating different shooting angles in Part 2 has exascerbated it. Fortunately it's a minor condition, symptoms are damp and/or dirty patches mostly on left knee but occasionally the right as well.

Dirty knee on a pair of jeans - photographer's knee

So far the list of things affecting my knee(s) have been:
  • Mud
  • Wet pavement
  • Loose grass clippings
  • Sea water
  • Sand (least problematic, just brushes right off)
  • Morning dew
There's no setting on the camera to help and nothing in the Nikon manual.

Squatting down instead of dropping to one knee alleviates it but then there's the problem of getting back up again ... #mustgetfitter.

So far, a good wash has solved all flare ups but I am thinking of preventative measures whilst I work on improving my leg muscles. I'm considering taking kneelers out with me like those used by gardeners. Any other tips would be appreciated ;-)

Thursday 5 September 2019

Holey Suns crochet jar covers


I am pleased to publish another free crochet pattern, this one is for a lacy jar cover like the ones in the photograph above.

All instructions are written using U.K. crochet terms

The version here on my blog will remain free for as long as the blog exists. For ease of use, A print-ready PDF is now also available, free for a limited time! 

Sizing Information

The basis of this jar cover is a the holey sun motif, full instructions and chart below. Each motif will come out at around 1.75 inches and needs to be slightly stretched to show itself to best advantage. Measure your jar around the circumference to see if it is appropriate for this design. In the photograph above, the motifs are stretched so they are a little under 2 inches wide. 

From left the circumferences and number of motifs used in the resoective jars illustrated are as follows:

Olive jar 300g (3 rings of six motifs), 297mm/11.75" circumference
Marmalade jar  (2 rings of 5 motifs), 227mm/9" circumference
Straight sided high ball glass (3 rings of 5 motifs) 225mm/9" circumference
Sharwoods Mango chutney jar 360g  (3 rings of 4 motifs), 200mm/7.75" circumference

Materials

2mm hook 

10-25g Lace weight cotton or linen thread, depending on the size of the jar. I used 3-ply linen on the example here in the tutorial but the ones in the photograph above were made with Scheepjes Sugar Rush or Scheepjes Bon Bon which is a cotton 2-ply. Rico's Creative Melange (Lace Weight) or Rico's Crochet Essentials would also work well.

Darning needle for weaving in ends

Abbreviations
ch - chain
dc - double crochet
dtr - double treble
ttr - triple treble
dtr2tog - two dtr joined at the top, see special stitches section below
ttr3tog - two ttr joined at the top, see special stitches section below
st - stitch
ss - slip stitch
rs - right side
beg - beginning
sp - space
sps - spaces

SPECIAL STITCHES YOU WILL NEED LATER

Instructions on working dtr2tog 
yo twice, insert hook into previously worked st, yo, pull through st (4 loops on hook), (yo, pull through 2 loops) twice (2 loops on hook), yo twice, skip 1 st, insert hook in next st, yo, pull through st (5 loops on hook) yo, (pull through 2 loops) twice (3 loops on hook) yo, pull through 3 loops

Instructions on working ttr3tog 
yo 3 times, insert hook in top of dtr2tog, yo, pull loop through st, (5 loops on hook), (yo, pull loop through 2 loops) 3 times (2 loops on hook), yo 3 times, insert hook into ss, yo, pull loop through ss, (6 loops on hook), (yo, pull loop through 2 loops) 3 times (3 loops on hook), yo 3 times, insert hook into dtr2 tog, yo, pull loop through st, (7 loops on hook), (yo, pull loop through 2 loops)  3 times, (4 loops on hook), yo, pull loop through 4 loops


FIRST MOTIF

Round 1: Wrap yarn around index finger 5-6 times. Without removing the resultant ring, squeeze hook underneath the yarn wraps, yo, pull the loop down past the wraps, ch 1, pulling it as tight as you can to secure and remove from finger.  


24 dc into ring, ss into first dc (24 dcs)

Tip: it is easy to mistake the first ch as a dc, (the photograph below shows the correct place).


Do not turn (rs faces you throughout this project)

Round 2: ch 3, skip 1 st, dtr in next st (darning needle in the photo below indicates the place)


*5 ch, dtr2tog (instructions for working this stitch are in special stitches section above), repeat from * all round, working the final “leg” of the dtr2tog into the base of the ch 3 that this round started with, (photograph below indicates where this is)


5 ch, ss into top of dtr.


Cut yarn, leaving an end long enough to thread onto a needle to weave in later. Fasten off by pulling the end through the loop on your hook. You should have twelve "rays" (created by the dtr2togs) joined with twelve 5 ch spaces. Your motif should measure approximately one and three quarter inches (45mm).


SECOND MOTIF when working this motif, it is joined to the first motif during the second row

Work round 1 as per first motif

Work round 2 but stop after 4 “rays” have been created, ch 2,


holding yarn high out of the way, insert hook into any 5 ch string on first motif as indicated in above photograph, yo, pull through loop on hook (thereby working a ss), 2 ch, 

Turning your attention back to the second motif, dtr2tog, 2 ch 


ss into next 5 ch string on first motif as indicated in above photograph, 2 ch,  *dtr2tog, 5ch repeat from * completing the twelve rays by working the second "leg" of the final dtr2tog into the base of the 3 ch at the beg of the row (see photograph below) 


5ch, ss into top of dtr, cut yarn leaving a long enough tail to weave in later, fasten off, leaving a tail long enough to weave in later.

THIRD MOTIF

Join on more motifs until you have the total needed to go round the girth of the jar minus one (the final motif is joined in more places, see below for instructions). The motifs should be in a straight line, with four 5 ch spaces either side of the joins as below. 


TO COMPLETE THE FIRST RING OF MOTIFS

Make and join another motif, stopping after this motif has ten rays. Fold the line of motifs in half and then identify the two 5ch spaces to join to using the picture below as a guide, there should be four 5ch spaces to the left and right of the two you need. Join in the manner established to the 5ch space on the right first and then the other. Fasten off. 


Try the ring of motifs out on your jar. It should be slightly stretched to give the best effect. Further rings of motifs will enhance the effect.


At this point, it’s a good idea to weave in the ends before starting on the next ring of motifs.

FIRST MOTIF OF SECOND RING

Make another motif in the now established manner stopping after you have 4 rays, ch2 and then join the motif in the manner established to four of the 5 ch spaces on the first ring in the order indicated below and then finish the motif. 


SECOND MOTIF OF SECOND RING

Make another motif in the method now established, stopping after four "rays", this time, join the motif to six of the 5 ch spaces on the first ring in the order indicated below.


When joining the last motif of the second round, you will need to join the motif to eight of the 5 ch spaces.

For medium sized jars, two rings of motifs may be enough but if you need another, repeat the instructions for the second ring. My 300g olive jar, required three rows.

STRAIGHTENING ROW

Locate the uppermost two 5ch sps in any motif in the first ring (as indicated by the darning needles in the photograph below). 


Make a slipknot in your yarn, leaving a tail long enough to weave in later, insert hook in the 5ch sp on the right hand side, pull slipknot through, ch 1 (does not count as a stitch) pulling it quite tight, *dc in 5ch space, ch 3, dc in next 5 ch sp, ch 3, tr in the next 5ch sp, 3 ch, ttr3tog in the intersections indicated below (instructions for working ttr3tog are explained above in the special stitches section),


3 ch, tr in next 5 ch sp, 


3 ch, repeat from * all round, ss into top of first dc, do not fasten off.

The next three rows forms a rounded bottom for the jar so the jar cover won't slip off. 

FIRST REDUCING ROW

For this row, we will be working into the top of stitches and ignoring all the 3 ch spaces, the darning needles in the photograph below indicates where to work


ch 3, skip 3 ch sp, dtr in st, * ch 2, dtr2tog, repeat from * all round. The row will look like a zig zag. 


Finish with 2 ch, ss into top of the dtr at the beginning of the row as indicated above.

SECOND REDUCING ROW

Again working in sts and skipping the ch 2 sps as you did in the First Reducing Row, ch 3, skip 2 ch sp, dtr in st, * ch 1, dtr2tog, repeat all round. Finish with 1 ch, ss into top of dtr at beginning of row.

THIRD REDUCING ROW

Working in sts and ignoring the 1 ch sps, ch 3, skip 1 ch sp, dtr in st, dtr2tog all round, finishing with ss into dtr at beginning of round. cut yarn and fasten off by pulling yarn through loop on the hook. weave in the end.


Try the jar cover onto your jar, it will now not slip off the botton of the jar.


To finish the jar off, we need to do the top now. Try the cover onto your jar again. As you can see from my photo above, the cover is about a centimeter below where the shoulder of the jar starts to curve in. This is exactly where I want it to be as it needs to be stretched a little to show the motifs off to their best. I am now ready to finish off the top. 

Once your cover is about a centimeter below the shoulder of the jar, repeat the Straightening Row.

NB If your cozy is still a little short from the shoulder, or your jar has straight sides work the First Reducing row but ch 3 (instead if 2) after each dtr2tog. This will give you a nice row of zig zags but without reducing the size of the round.

Repeat the First Reducing Row.

Try on the jar cover and assess whether the shoulder has been covered and you have reached the straight neck of the jar. The reducing row might make it slightly tricky to get on but once it is on, you can see it curves nicely around the shoulder pulling the rest of the cozy up and stretching the motifs.


From the photograph above, you can see my First Reducing row has only covered half of my jar's shoulders. I therefore repeated the First Reducing Row (NB not the Second Reducing Row) to reach the bottom of the neck of the jar. You may not need to do another row and can go straight to the finishing row(s) below.

FIRST FINISHING ROW

ch 4, * dtr in 2 ch sp, 1 dtr in next st repeat from * all round finishing with dtr in final 2 ch sp, ss into top of beg 4 ch at the start of the round.

SECOND FINISHING ROW

NB, If your jar has a small neck, you may not need to do this row and can jump straight to the next row. Try it on to check, mine needed a Second Finishing Row.
ch 4, dtr into every st all round, ending with ss into top of beg 4 ch at the start of the round.

FINAL FINISHING ROW

ch 1, dc into same st, dc in next st, *ch 3, ss into first ch (forming a picot), dc in each of next 3 sts, repeat from * finishing with dc in final st(s), ss into first dc at beginning of round. Fasten off. Weave in all remaining ends. 


Saturday 3 August 2019

Tinker, tailor, soldier, Josh


Let me set the scene. We're sat in the lounge, MTM is in an armchair on his laptop doing the weekly online grocery shop. I'm on the sofa working on my iPad.

MTM: "Do we need butter?"

Me: "Yes"

.... tap tap tap

MTM: (holding up the scrap of paper on which I note things we've run out of)  "What is cinnamon powder? Do you mean GROUND cinnamon?"

Me: "Ah yes!" (both laugh) "I was in a hurry when I wrote that, we've got cinnamon STICKS but I forgot what the word was. GROUND is what I meant!"

.... tap tap tap.

MTM closes laptop "Done". He gets up and sits beside me on the sofa, he notices I'm on Etsy.  "Whatcha doin'?  Isn't that the site of all things calamitous and bedevilled in Sue-World?"

"It is, my love, but Our Man In Havanna (actually a talented jeweller on the East Coast) is feeding me info about my US Etsy search positions. Intelligence tells me, despite holding up well in the rest of the world, my listings there have indeed fallen off a cliff.  Just as thing-of-evil (in Sue-World) Josh Silverman threatened  But I think I may be able to beat him at his own game. I have a cunning plan .... mwahhh haaa haaaa!"

"So you're staying with Etsy."

"Only for the time being ... but I HAVEN'T given in, I'm NOT offering fake free shipping."

"Of course, don't let the Bar Stewards powder you down".

Thursday 25 July 2019

I ain't gonna work on Josh's farm no more - Etsy's Fake Free Shipping is a farce


A waning half moon provides an appropriate time to say that I think my days of selling lampwork bead sets on Etsy may be coming to an end.  

At the end of July, Etsy management are threatening to prioritise in their search engine only sellers offering free shipping to US customers.

If we don't want to absorb the cost ourselves, we have to roll it into the price of our items which is problematic for a number of reasons that are being pointed out to management and they aren't taking any notice.

What it boils down to for my shop is this. If I increase my cost per item to cover "free" shipping, it isn't free and it isn't fair to customers who buy multiple items and customers whose countries are cheaper to ship to than the USA. 

This is FAKE FREE SHIPPING.

Here's a link to a YouTube video which covers the things that have been making me angry for days now and it isn't lessening the more I think about it, I'm gnashing my teeth about being coerced into running my business in a different way by people who I PAY. If I added up all the fees Etsy have charged me over the last eight years I would probably have a heart attack and now they're trying to push ME around! Shouldn't I be the boss of them if I'm paying for the privilege of selling my items on their platform?

The New Moon is on 1 August and as that's the day I will find out if Etsy carry out their threat, this is the Universe telling me it's a good time to start doing something else, I know this seems like I'm cutting my nose off to spite my face because Josh Silverman won't even notice I'm gone but I have to protest. I have told him what I think in the Etsy survey and in the Etsy forums but I'm sure he's still going to do it. 

I want to leave right now but MTM has persuaded me to wait and see if it happens first of all and then take time to see what impact it has on my business.

But this is a pattern with me, I did it years ago, quit a job I liked that was well paid for a super boss because of an unfairness over bonus payments.

In the short term I regretted it, it felt reckless, daft and short sighted, but in the end it led me to going back to college. I retrained and had a whole other career in IT for a while that paid even better. But again, I had to leave because things outside of my control dictated who I worked for and I had no respect for my new boss.

Ultimately, that's how I ended up doing what I do now, leading a creative life which I love (it's unfortunately NOT very well paid!) but that's what I do ...I leave things I love behind and I cannot stop myself, I know if Etsy carry out their threat to send my shop into search obscurity, I will do it and there's not a damn thing anyone can say to dissuade me. 

If the pattern continues, it will lead to something even better next and I can't wait to find out what that is!

Sunday 30 June 2019

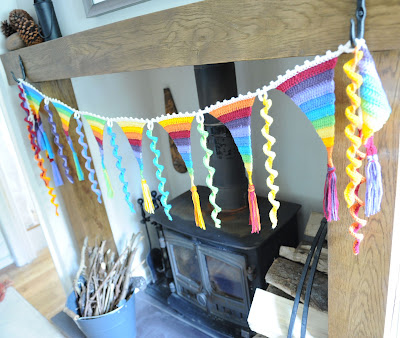
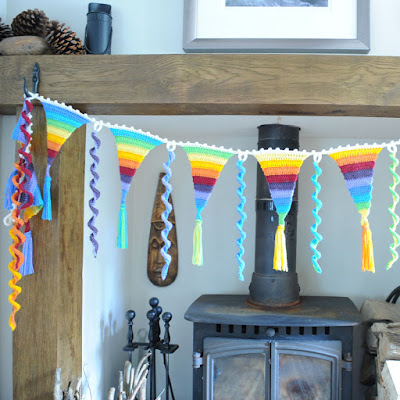
Crocheted rainbow bunting

Rainbow bunting celebrating Pride month 2019

Crocheted rainbow bunting made in June 2019 to celebrate Pride month. 


I started making it when Ravelry made it's announcement that it was banning conversation about Donald Trump on its website as follows:

"We are banning support of Donald Trump and his administration on Ravelry. We cannot provide a space that is inclusive of all and also allow support for open white supremacy. Support of the Trump administration is unambiguously support for white supremacy. For more details, read this document: https://ravelry.com/content/no-trump"


This is a position I wish to support.

Monday 15 April 2019

Long tall sally crocheted scarf pattern


ABBREVIATIONS (using UK terms)

st - stitch
ch - chain
tr - treble
htr - half treble
PSM - place stitch marker in previous ch (or st) just worked
dc - double crochet
sts - stitches

MATERIALS

2.5mm and 3.00mm crochet hook
I used Rico's Creative Melange one 50g ball was enough for my scarf (65 inches long by two and a half inches wide), if you make yours longer or shorter, you may need to adjust yarn quantities.
Darning needle
Two stitch markers


GAUGE

32 st x 20 rows worked in pattern equates to 4 inches though please note, the width of the finished scarf is only two and a half inches. It's a tall and skinny scarf (hence the name!)

HOW TO WORK THE SPECIAL STITCHES IN THIS PATTERN

dangle ending:
3 tr in 4th chain from hook, 4 tr in next ch, 4 htr in next ch, 1 htr in next ch

dtr3tog:
yo twice, insert hook in previously worked st, yo, pull through st (4 loops on hook), (yo, pull through 2 loops) twice (2 loops on hook), yo twice, skip 1 st, insert hook in next st, yo, pull through st (5 sts on hook), (yo, pull through 2 loops) twice (3 loops on hook), yo twice, skip 1 st, insert hook in next st, yo, pull through st (6 loops on hook), (yo, pull through 2 loops) twice, yo, pull through 4 loops on hook, ch 3

dtrxst:
yo twice, skip 1 st, insert hook in next st, yo, pull through st (4 loops on hook), yo, pull through two loops, yo, skip 1 st, insert hook in next st, yo pull through st (5 loops on hook), (yo, pull through 2 loops) 4 times (1 loop on hook), the stitch looks like an upside down lowercase “y”, ch 1, tr in intersection of the “y” to complete an “X” shape

FOUNDATION ROW

If, like me, your chains tend to be on the tight side, use a 2.5mm hook to ch multiples of 4 (I did 464), change to 2mm hook, ch a further 22, make a dangle ending (see above special stitches), dc in each of next 15ch, PSM, dc in every ch to end, 15 ch, turn

Row 1:
make a dangle ending, dc in each of next 8ch, htr in next st, tr in next st, dtr in next st, ch 1, dtr3tog, *ch 3, dtr3tog, repeat from * until 2 sts before you reach the stitch marker


ch 1, dtr in previous st (indicated above), tr in next st, htr in next st, ch 18, turn

Row 2:
make a dangle ending, dc in each of next 11ch, dc in each of next 3 sts, dc in 1ch sp,


dc in centre of dtr3tog, PSM, * 3 dc in 3ch sp, dc in centre of dtr3tog, repeat from all along length, ending with dc into the centre of the final dtr3tog, ch 20, turn


NB do not worry if your work curls a bit like this like mine, it will even out later

Row 3:
make a dangle ending, dc in each of next 13 ch, dc in every st up to and including stitch marker, remove stitch marker, ch 29, turn

Row 4:
make a dangle ending, dc in each of next 19 ch, htr in next ch, tr in next ch, dtr in next ch, ch 1, PSM, *dtrxst, ch 1, repeat from * all along length, ending with ch 1


NB Each dtrxst should span a 3ch space inbetween the dtr3togs worked on row 1


The final repeat should span the final 3ch space of row 1 (as above), skip 1 st, dtr in next st, tr in next st, htr in next st, ch 26, turn

Row 5:
make a dangle ending, dc in each of next 19 ch, dc in each of next 3sts, dc in 1ch space, PSM, * dc in next st, dc in 1 ch sp, repeat from * all along length up to and including marker, remove marker, ch 23

Row 6:
make a dangle ending, dc in each of next 16 ch, dc in every stitch all along length until stitch just before marker, remove marker, ss into next stitch, fasten off. First half of Long Tall Sally scarf complete.

FOUNDATION FOR SECOND HALF

Turn scarf upside-down. With the end with three dangles to your right, identify the third ch from the foundation row (see below). Reattach yarn there and then ch 22, turn


Row 7:
make a dangle ending, dc in each of next 15 ch, dc in same ch as yarn reattached, dc in each of next 4 st, PSM, dc in every ch all along length until stitch indicated below


ch 18, turn

Row 8:
make a dangle ending,  dc in each of next 8 ch, htr in next ch, tr in next ch, dtr in next ch, dtr3tog, *3 ch, dtr3tog, repeat from * working the final leg of the dtr3tog where stitch marker is, remove stitch marker, ch 1, dtr in same st, tr in next st, htr in next st, ch 13, turn

Row 9:
make a dangle ending, dc in each of next 6 ch, dc in each of next 3 sts, PSM, dc in 1 ch sp, dc in centre of dtr3tog, *3 dc in 3 ch sp, dc in centre of dtr3tog, repeat from * ending with final dtr3tog, dc in each of next 2 sts, ch 20, turn

Row 10:
make a dangle ending, dc in each of next 13 ch, dc in next 3 sts, PSM, dc in every st all along the length up to and including stitch where stitch marker is, remove stitch marker, ch 21, turn

Row 11:
make a dangle ending, dc in each of next 11ch, PSM, dc in each of next 2 ch, 1 htr in next ch, 1 tr in next ch, 1 dtr in next st, *ch 1, dtr in next st, repeat from * all along length, ending in dtr in st where stitch marker is, remove stitch marker, tr in next st, htr in next st, ch 24, turn

Row 12:
make a dangle ending, dc in each of next 17ch, dc in next st, PSM, dc in each of next 3 st, *dc in 1 ch sp, dc in next st, repeat from * all along until you have no more ch sps, dc in each remaining st up to and including where stitch marker is, remove stitch marker, ch 17, turn

Row 13:
make a dangle ending, dc in each of next 10ch, dc in every stitch all along length up to and including stitch marker, remove stitch marker, ss in next st, fasten off.

FINISHING

Blocking does not make much difference to this scarf's finished appearance but do feel free to block if you have any curling issues as it will straighten this out.


Close up of the dangle endings.