I published the chart for my lacy dress scarf at the back end of last year. It has had a lot of hits on it recently, I imagine people are looking for lightweight scarf patterns for summer. A few have asked for written instructions and I'm delighted to now be able to oblige. I’ve included some photos as well. I know when I’m following a pattern for the first time, pictures can be very reassuring.
All instructions are written in UK crochet terms
Materials
This version uses 2.5mm crochet hook and 2 x 50g balls of Rico Creative Melange laceweight yarn although much will depend on how long and wide you make your scarf, adjust yarn amount accordingly
Materials
This version uses 2.5mm crochet hook and 2 x 50g balls of Rico Creative Melange laceweight yarn although much will depend on how long and wide you make your scarf, adjust yarn amount accordingly
Abbreviations
ch - chain
dtr - double treble
sp - space
dc - double crochet
Foundation row:
Make a slip knot on your hook, ch multiples of 7 plus a further 8. For this version, I chained 43, ie 5 x 7 = 35 + 8 = 43. (2 dtr, ch 1, 2 dtr) in 10th ch from hook * ch 1, skip 6 ch (2 dtr, ch 1, 2 dtr) in next ch, repeat from * until 5 ch remain, ch1, skip 4 ch, dtr in final ch, turn
Row 1:
ch 7, dc in first 1 ch sp, (see photo below for the place)
ch 3 * skip 2 dtr (2 dtr, ch 1, 2 dtr) in 1 ch sp, 3 ch, skip 2 dtr, dc in 1 ch sp, 3 ch, repeat from * until you reach 9 ch at the end (see picture below for how work will look at this stage)
(dc, 3 ch, dtr) in 9 ch sp, turn
ch 3 * skip 2 dtr (2 dtr, ch 1, 2 dtr) in 1 ch sp, 3 ch, skip 2 dtr, dc in 1 ch sp, 3 ch, repeat from * until you reach 9 ch at the end (see picture below for how work will look at this stage)
(dc, 3 ch, dtr) in 9 ch sp, turn
Row 2:
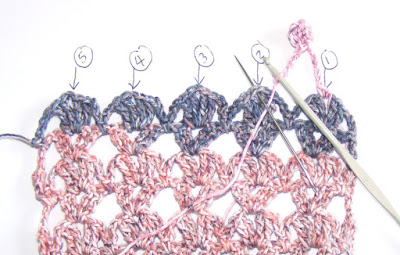
ch 5, * (2dtr, ch 1, 2 dtr) in 1 ch sp marked “1”,
ch 1, repeat from * working only into the 1 ch sp inbetween dtrs indicated by numbers on the photo until you reach 7 ch at the end, dtr into 7 ch sp, turn
ch 1, repeat from * working only into the 1 ch sp inbetween dtrs indicated by numbers on the photo until you reach 7 ch at the end, dtr into 7 ch sp, turn
Row 3:
Same as row 1, except the ch sp you work into at the end is a 5 ch sp
and this will be true for all subsequent repeats
and this will be true for all subsequent repeats
Repeat rows 2 and 3 for the length desired ending on a row 2, do not fasten off.
Bottom finishing row:
ch 4, skip (1 ch, 2 dtr)
*(2 dtr, 1 ch, 2 dtr) in 1 ch sp indicated above, ch 3, skip 2 dtr,
dc in next 1 ch sp indicated above, ch 3, skip 2 dtr, repeat from * moving along the row, ending on (2 dtr, 1 ch, 2 dtr) in 1 ch sp
ch 4, dc in 5 ch sp indicated, fasten off
*(2 dtr, 1 ch, 2 dtr) in 1 ch sp indicated above, ch 3, skip 2 dtr,
dc in next 1 ch sp indicated above, ch 3, skip 2 dtr, repeat from * moving along the row, ending on (2 dtr, 1 ch, 2 dtr) in 1 ch sp
ch 4, dc in 5 ch sp indicated, fasten off
Top finishing row:
Turn work upside down with yarn tail to your left. Rejoin yarn in 7 ch sp at right hand corner indicated above, leaving a tail long enough to weave in later, ch 4, *skip rest of chs in the ch sp
(2 dtr, 1 ch, 2 dtr) in ch sp indicated above, ch 3, dc in 6 ch sp, ch 3, repeat from * ending with (2dtr, 1 ch, 2dtr)
ch 4, dc in corner st indicated, fasten off. Weave in ends.
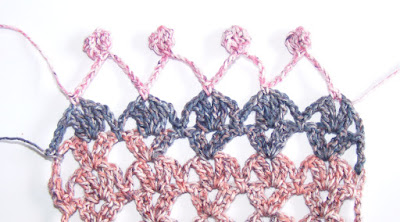
Add a fringe of your choice or you can make the one I did. I originally found the instructions for this bobble fridge via Pinterest on Once Upon a Pink Moon's blog. I thoroughly recommend you go look and see all the things Robin gets up to on her blog, she is a very creative and talented lady. On that website it's written in US terms so I've converted it to UK terms for you here and I have modified it ever so slightly. I'm including a few photographs here to show you exactly how to add it to this scarf.
Step 6 - yo, pull yarn through (2 loops on hook), yo, pull through both loops, ch 6, skip (2 dtr, 3 ch, dc, 3 ch, 2 dtr), dc in 1 ch sp indicated below
The scarf will benefit from blocking, it brings out the lacy stitches beautifully. Drop the scarf in a bowl of tepid water and then very gently squeeze the excess water out (do not wring!) Roll it up in a dry towel to blot out some more. Lay the scarf on fresh dry towels (I needed two laid end to end) over carpet or a blocking board and then pin it out gently, stretching it a little as you go using rustless stainless steel pins. Pay particular attention to the "points" created on the finishing rows by placing a pin in the 1 ch sp, being careful to keep them in a straight line.
Leave to dry overnight and then you can wear it!
Turn work upside down with yarn tail to your left. Rejoin yarn in 7 ch sp at right hand corner indicated above, leaving a tail long enough to weave in later, ch 4, *skip rest of chs in the ch sp
(2 dtr, 1 ch, 2 dtr) in ch sp indicated above, ch 3, dc in 6 ch sp, ch 3, repeat from * ending with (2dtr, 1 ch, 2dtr)
ch 4, dc in corner st indicated, fasten off. Weave in ends.
Add a fringe of your choice or you can make the one I did. I originally found the instructions for this bobble fridge via Pinterest on Once Upon a Pink Moon's blog. I thoroughly recommend you go look and see all the things Robin gets up to on her blog, she is a very creative and talented lady. On that website it's written in US terms so I've converted it to UK terms for you here and I have modified it ever so slightly. I'm including a few photographs here to show you exactly how to add it to this scarf.
Step 1 - Rejoin yarn by making a slip knot loop and pulling through the first 1ch sp (indicated above), ch 1, dc in same sp
Step 2 - ch 9, yo, insert hook in 3rd ch, yo, pull yarn through, yo, pull yarn through 2 loops (2 loops on hook) *yo, insert hook into same ch, yo, pull yarn through, yo, pull yarn through 2 loops (3 loops on hook), repeat from * once (4 loops on hook) **
Step 3 - yo, pull yarn through 4 loops, ch 3 (see below for how your work will look)
Step 4 - yo, insert hook into 3rd ch from hook (indicated above), yo, pull yarn through, yo, pull yarn through 2 loops (2 loops on hook), repeat from * to ** twice
Step 5 - yo, pull through 4 loops. Insert hook into the V of the ch at the bottom of the first bobble indicated below. This has the effect of “folding” the two bobbles on top of each other.
NB It's quite fiddly to do, you will need to wiggle the tip of the hook into each side separately, it is quite tight because of the number of stitches worked into it already.
Step 6 - yo, pull yarn through (2 loops on hook), yo, pull through both loops, ch 6, skip (2 dtr, 3 ch, dc, 3 ch, 2 dtr), dc in 1 ch sp indicated below
Repeat steps 2 to 6 all the way along, ending in final 1 ch sp with dc, fasten off. Repeat the fringe on the other end and then weave in all ends.
Leave to dry overnight and then you can wear it!


Thanks so much for the written pattern & pictures!
ReplyDeleteSo glad to have the written pattern. Thank you!
ReplyDeleteA very pretty lacy scarf!
ReplyDeleteLooks easy enough. appreciate the written pattern
ReplyDeleteThank you so much for posting the written instructions for this scarf. Just wondering if you would be able to send or post a video of starting the first few rows. I learn better by seeing rather than reading. My email is lijomc08@hotmail.com. Also, what is a double treble? Thanks in advance.
ReplyDeleteHi there, sorry I don't have the time to make videos at the moment but I am planning to in the future. A double treble in UK crochet terms is worked like this: wrap your yarn around hook twice, insert hook into stitch, pull through a loop (4 loops on hook), * yarn over, pull yarn through two loops, repeat from * twice more.
DeletePls add video in English
ReplyDelete