Monday, 17 December 2018

Not quite Doctor Who crocheted scarf

There are coincidences and then there is serendipity. This story falls under the latter descriptive noun because it's not just a random fluke, the universe has been purposefully whispering to me and the conjunction of two things has produced this scarf.

Firstly, over three or four visits to the Wool Zone in Oakham, I have been collecting one ball of each colour in Stylecraft Yarn's new Bellissima range. It's wonderfully soft; definitely wearable next to the skin,  I wanted to make something with it but I wasn't sure what.

Secondly, I have seen publicity online for the Special episode of Dr Who to be broadcast on New Year's Day.  Jodie Whittaker is wearing the most gorgeous scarf, it looks like it's made with some kind of fleece fabric, of course I prefer winter scarfs to be knitted or crocheted. The original was designed by Mark Smith in Nottingham, unsurprisingly, his on-line shop has sold out already!

You can see where I'm going with this ... 


In a perfect universe, there would be a teal in the Stylecraft Bellissima range but when I put my colour cards together, that's when I realised I was meant to crochet this scarf. Sugar Snap stands in magnificently and looks just great. All the same, if Cosmic Santa is reading, he could drop a hint to Stylecraft that the next colour in the Bellissima range should be teal. (And if  I'm not being too greedy, orange as well ...)

If Doctor Who discovers a ball of Bellissima Teal in the future, I hope she will use the Tardis to drop it off at my house about 5 nights ago, that would be much appreciated.

If I'm not back before, I wish everyone a very Merry Christmas. 

xxx


Saturday, 10 November 2018

Moving into the new craft room


My new craft room in the loft is nearly ready to move into. It’s been a busy few weeks trying to fit the decorating in amongst having a week’s holiday and keeping my bead shop stocked.


I hadn’t done any wallpapering for about twenty years but fortunately, I hadn’t forgotten.


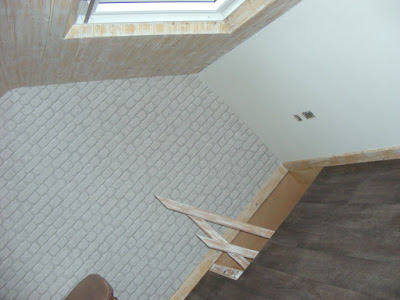
There is a lot of work in the ceiling. It looked a bit like a sauna when the matchboarding was first fitted. I wanted a distressed look ... which takes more doing than you might realise. All the nail holes had to be filled and sanded (I had a power tool for that bit so it went quite quick).a A coat of antique pine wood dye got rid of the new timber colour, then a single coat of watered down emulsion. To make it look like it had naturally weathered off, those layers were then h.a.n.d. sanded.  I couldn't use the power tool for that bit as I had to go slow and steady and stop when it looked right. At this point, I was beginning to wish we'd just plastered the lot as it would've been much quicker to just put two coats of emulsion on it but finally it was sealed with two coats of clear satin varnish and I'm delighted with it. All the work removed my fingerprints, for a fortnight my iPad refused to recognise me unless I put my passcode in!


The bannister is being fitted today by the joiner as I type. We’re having floor to ceiling spindles rather than a short one with a handrail on top, as you can see, the staircase has an integral handrail so doesn’t need another. The tall spindles will be a bit of a design feature as well as stopping anyone falling down the side of the stairwell.

The electrician is coming on Monday to fit light fittings, socket and a small heater.

,,u

The contents of the craft room have been collected from storage and are in boxes in the spare bedroom.

Some self-assembly storage shelving thingees are also arriving next week but there seems to be far more boxes than I remember ... I’m hoping it will all fit!

Wednesday, 31 October 2018

Happy halloween


Apologies to trick or treaters, a giant Pom Pom monster has eaten all the chocolate.

Happy Halloween anyway!

Saturday, 13 October 2018

What matters is Dad’s rhubarb survived


We have built steps alongside my raised vegetable beds and painted the timber black. There was a grass sloping path going up there before which I thought would be easy to maintain ... just mow and go! But it didn’t really work, it is hard work to mow on a slope; I could just about do it by going downhill, letting gravity assist but I still had to haul the mower backwards up to do the next strip and there was always the danger if by chance I accidentally let go, the mower would end up in the river! And all the edges to trim .... of course those got left to grow long and I would only cut them once a month, it looked a mess. 

We did think about putting mowing edge strips in which would’ve solved the edge trimming problems but we decided to rid ourselves of both problems by making steps in the same timber as the beds. MTM did the carpentry but I helped holding the steps level in place whilst he screwed coachbolts in. So there we have it, one of my bad ideas remedied with barrow loads of limestone mixed with stones collected from my flower beds to make a hardcore base, rammed solid with a heavy lump hammer and buckets of gravel as top dressing. 

So, it’s been a while since I wrote about my vegetable plot, nearly two years, I expect you want to know why I haven’t been photographing neat rows of veg and trugs full of produce, don’t you? (You may as well say “yes” seeing as I’m going to tell you anyway). 

Raised beds drain quite freely and need more watering. I have a large water butt handily close, collecting water from the roof which I thought would be enough to cope with any dry periods. I planted a load of seed potatoes and had an early enthusiastic rush of seed sowing in the Spring of 2017. The water butt emptied remarkably quickly, the outside tap is a long way off and carrying watering cans wasted too much time. I had to keep relocating my hosepipe and trailing it across everywhere was also a pain. I needed another hosepipe, one was duly obtained but the fittings were wrong, they kept coming off - why isn’t there just one system for this kind of thing? This was all before I had my own car and so I had to rely on MTM conveying me to buy the right ones. By the time the hosepipe was laid under the decking so it was out of the way and we had the correct fittings the veg plot had been abandoned to itself, I got a few potatoes which chastised my lack of care by developing scab they peeled OK and we ate them but everything else ran early to seed and I didn’t sow any more due to the watering problems. The only plants I attended to were the rhubarb and strawberries transplanted  from my dad’s garden as I would hate to lose those.


We did have quite a lot of strawberries that year, I didn’t take enough photographs .... they got eaten VERY quick! I was leaving the rhubarb to get well established before harvesting. The received wisdom is to leave it for a year.

Ok, so that explains no produce in 2017, what about this year then? I have MUCH better excuses this year! There is a sycamore tree growing in the hedge along the boundary between us and a field next door. It doesn’t shade the plot as it faces South-West, the sun gets through in the afternoon in slanted rays. We trimmed off the lower branches when we put the beds in but thought we could leave those higher up.

Again, I had a frenzy of seed sowing in Spring 2018 and everything was coming through nicely. Then one day I went out and noticed all the seedlings, my beloved rhubarb and some of the strawberries were covered in a shiny substance that looked a bit like snail trails but it was all over and slightly sticky. The tree’s branches were infested with aphids which were raining down honeydew on everything underneath. I tried to wash it off using my very handy hose, it was easy to get off the tough rhubarb leaves but I had to be more gentle with everything else and of course it was only going to happen more. In a few days time, the honeydew I hadn’t got off had turned to sooty mould and the seedlings didn’t amount to much. I am very cross with the bird life for not keeping the aphids in check, much easier to help yourselves to my bird table is it?! No more sunflower seeds or peanuts for you!

A heavy shower got rid of the aphids onto the vegetable plot itself, they were everywhere and to be fair on the birds, they did help themselves once the aphids were on the ground. I cleared away was what left of my sowings and then the weather got hot didn’t it? Very hot in fact. Too hot for me to be outside but hey, this heatwave won’t last, I will sow some more seeds when the weather cools down .... and of course it didn’t cool down for weeks and weeks. I limited my time outdoors, I hate being active in the heat. I just about kept up with weeding in the flower beds on the ornamental side of the garden where I had invested in some shrubs and perennials.


So, summer passes, the heat stays. It finally cools and there’s still time to grow some quick maturing crops so I get the seed packets out again. They germinate, I diligently hoe and water them. Finally, I will get some produce! But then another disaster strikes. There are sheep in the field opposite and next to us, they’re fenced off so they can’t get into our garden .... or can they? There is a kind of gateway wire fence across the river where the farmer’s land meets ours. It spans across the top of the river and normally the water is high enough so that the gap between the bottom of the wire is too small for sheep to pass under it. With the river being so low due to the drought, this was no longer the case and two enterprising sheep got under and into the vegetable garden which is not fenced off on our side. We only have a fence in the ornamental section to stop Bongo going into the river, he is excluded from the veg plot with an internal fence and a gate. What the sheep didn’t eat got trampled under their cute cloven feet.

The thing I’m grateful for is that rhubarb leaves obviously don’t taste very nice, in fact I think the leaves are poisonous, apart from a few missing mouthfuls, they left it alone. As luck would have it, the strawberry plants still had the wire cloches that MTM made over them to stop the birds eating the fruit else I’m quite certain they would have been eaten as well. I’m so glad I didn’t lose them I have now planted some runners in the ornamental section as an insurance protection against it happening again. 

We’ll see what happens next year! 


Tuesday, 25 September 2018

Progress photos on latest refurbishments


A few pictures of where we are on the two rooms we are refurbishing. As usual, being married to a builder means I’m the one who has to wait ... the client who is paying with late penalty clauses always comes first! To be fair to MTM, the reason we’re still living on a building site this time isn’t all down to his busy work schedule. We got messed around timings wise by our favourite plasterer. He is always in demand and then he decided he was going on holiday (how very dare he?!)

A space saving new staircase has been installed in the spare bedroom which goes up into the loft area which will be my new craft room. There was a big cheer when this bit was finished; it was a bit touch and go whether we would achieve the necessary head clearance height required by Building Regulations. A whole 50mm to spare, what were we worried about, yea of little faith?


MTM’s  joiners were very busy working on a school over the summer. With the kids due back in early September, he couldn’t spare anyone over the summer, this was the first opportunity to get them. There are still some bits and pieces to finish like the bannister and trim to the edge of the staircase opening and covers for inspection holes in the eaves but we are now in a position to book the electrician and plumber for their second fix operations. 


As you can see, I have already started decorating, putting a single mist coat over the bare plaster in the craft room. I used some leftover Calico emulsion from when we did the utility area but I ran out (I thought I just had enough, I would never make a good estimator). I’ve got some white emulsion now to finish it but doesn’t matter that it’ll be bicoloured as the gable ends are going to be wallpapered.


I was a bit miffed that we had to cover up the lovely old Victorian wall and beams that were there before.


MTM insisted it had to be insulated and dry lined. This is a solid wall, once we start heating the room, it would get condensation and mould would quickly grow. You have to form a cavity to remove the cold bridge.  I had to agree although I would enjoy looking at it, long term it would be no good working up there in winter in the freezing cold with teeth chattering. Also, it’s necessary for Building Regulations approval. We have found some wallpaper which looks like old brickwork so hopefully when it’s decorated it will look almost as good.


The light provided by the Velux windows in the craft room provide a really good light. I always struggle to find somewhere indoors where I can crochet with black yarn as the light needs to be really good for my middle aged eyes to cope; I’m looking forward to positioning some comfy seating right under one of them. 


Looking through the staircase to the door to the landing and stairs down to the ground floor.


When we lifted the carpet on the landing at the top of staircase to the ground floor, we found the edges of the stairs have been painted green in the distant past and then, when the stringer was repainted more recently, there’s a line of white gloss on top of that. I’m thinking it’s probably like that all the way down. For the time being, the carpet is staying down as I’ve got quite enough to handle redecorating the two rooms for the time being. However my brain is buzzing with ideas of how to make a feature out of it in the future. 


This is a newly formed opening to what will be the ensuite shower room.


Here’s what it looked like when the brickwork was removed to form the walk through.  Goodness that generated a lot of mess!


We haven’t started the ensuite bathroom yet, although the electricity cable has been first fixed in readiness. As you can see, it’s just going into what used to be a small built in wardrobe for the other bedroom on the other side of the wall. MTM currently uses that room as his office. The wardrobe area will be enlarged to make room for the ensuite by taking a bit of space from the other room. Initially we were planning on doing it at the same time as the spare room but when we decided to go up and convert the loft, that took the budget plus we need to move MTM out but he still needed somewhere to work. 

The division MTM manages for his employer has expanded under his expertise and it’s got to the stage where his operation turns over £3m from our spare bedroom. They’ve decided (to our great relief) to rent some offices locally for him to run his commercial building contracts from. That was all supposed to happen in May but fell through. Alternative offices have been found and he’ll be moving in there soon but I’ve had enough disruption for now so I want to get these two rooms sorted before we start knocking about another so that will be put on hold as a future project. Guests will be able to use the main bathroom in the meantime.

All my yarn and other craft supplies along with some furniture from the spare bedroom. are being stored in a rented lock up. I’m desperate to get my yarn back in particular, as well as save that monthly expense so I need to get on. I’ve waffled enough for now, me and the decorating gear will be busy for the rest of this week. 


Thursday, 23 August 2018

Odd, uneven time

August rain: the best of the summer gone, the fall not yet born. The odd, uneven time.
Sylvia Plath


I am grateful for cooler weather. 37.2 is the record in my studio. 

37.2 degrees C is too hot to make beads in

I have had to abandon my studio so many times early in the afternoon due to getting too hot, it's severely affected the turnover of my business. I work in a glazed shed (one of those summerhouse style ones for the light) so it acts a bit like a greenhouse. I have all three windows and both doors flung open to their greatest degree but the South facing window is shaded. Add to that I'm hunched over a flame powered by Butane and Oxygen running at over 1000 degrees AND sat next to a kiln programmed to 520C ... well it's no wonder really.

Apologies to all who enjoy the heat but for me, a weather forecast in the early twenties means I can finally work all day again! 

Saturday, 18 August 2018

Grapefruits and their pips ... a metaphor


I observed today, after breakfast, that MTM had six pips in his grapefruit at breakfast whilst I had only one. He laughed and said that it was typical of his life, he always had more pips than anyone else. He ruffled Bongo’s ears and said “in the grapefruit of life, YOU are NOT one of the pips”. 
Aw ... :-)

I said “No, that’s me, I am a ruddy great big pip in your life” (I have been  difficult to live with this week, he puts up with a lot from me). He smiled and disagreed. Aw ... again, he’s brilliant isn’t he? 

He’s gone out for a haircut now and whilst he is out, I am cleaning the beads I made yesterday and have been pondering and turning over the pips in my mind which have now become a metaphor for all the crap that life chucks at you ... the proverbial fag-end in your beer can or stone in your left shoe.

When MTM gets pips, he just spits them out, chucks ‘em away and forgets. Whereas I swallow, digest and slowly absorb, therefore allowing them poison me from the inside out. I should learn to spit like MTM.

Wednesday, 15 August 2018

Flowers, flowers and more flower beads

This is the first set of pink flower lampwork beads I have ever offered for sale in my Etsy shop. There has been much experimentation and recording of what colours I put with what before they were perfect.

I have made green, orange and blue ones in the past


I'm delighted to announce that the range has been expanded, first with the pink ones I kicked off this posting with but purple, aqua and teal are also new.


I'm trying to push the colour range even further and am currently experimenting with red which is tricky to work with but I shall keep trying. Watch this space for news of my success (soon ... or later ... it may very well be later ... I am nothing if not persistent). 

I can imagine these flower beads being absolutely gorgeous as a pair of earrings with matching bracelet teamed with some silver, Czech glass and/or swarovski beads. I'm sure that lovely gardener, Carol Kline - whose earrings often feature flowers - would look fabulous in a pair if some enterprising jeweller sent her some!


Monday, 23 July 2018

Never mind stay out of the sun ... stay out of the studio


I had to abandon my beadmaking studio at lunchtime today. 

I’ve never enjoyed being hot at the best of times, when I’m trying to work, it’s doubly hard. I love England’s inclement and temperate climate, I’d rather be too cool than too warm. If I wanted hot weather I would move abroad ... #nevergonnahappen 

I need recommendations for cooler countries to emigrate to. 

Sunday, 15 July 2018

Crochet lacy dress scarf - written pattern


I published the chart for my lacy dress scarf at the back end of last year. It has had a lot of hits on it recently, I imagine people are looking for lightweight scarf patterns for summer. A few have asked for written instructions and I'm delighted to now be able to oblige. I’ve included some photos as well. I know when I’m following a pattern for the first time, pictures can be very reassuring.

All instructions are written in UK crochet terms

Materials
This version uses 2.5mm crochet hook and 2 x 50g balls of Rico Creative Melange laceweight yarn although much will depend on how long and wide you make your scarf, adjust yarn amount accordingly

Abbreviations
ch - chain
dtr - double treble 
sp - space
dc - double crochet

Foundation row:
Make a slip knot on your hook, ch multiples of 7 plus a further 8. For this version, I chained 43, ie 5 x 7 = 35 + 8 = 43. (2 dtr, ch 1, 2 dtr) in 10th ch from hook * ch 1, skip 6 ch (2 dtr, ch 1, 2 dtr) in next ch, repeat from * until 5 ch remain, ch1, skip 4 ch, dtr in final ch, turn

Row 1:
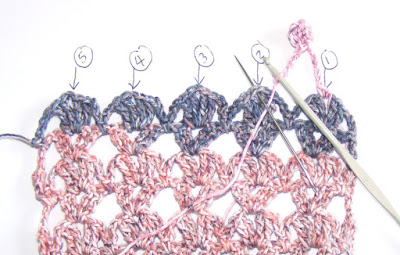
ch 7, dc in first 1 ch sp, (see photo below for the place)


ch 3 * skip 2 dtr (2 dtr, ch 1, 2 dtr) in 1 ch sp, 3 ch, skip 2 dtr, dc in 1 ch sp, 3 ch, repeat from * until you reach 9 ch at the end (see picture below for how work will look at this stage)


(dc, 3 ch, dtr) in 9 ch sp, turn

Row 2:
ch 5, * (2dtr, ch 1, 2 dtr) in 1 ch sp marked “1”,


ch 1, repeat from * working only into the 1 ch sp inbetween dtrs indicated by numbers on the photo until you reach 7 ch at the end, dtr into 7 ch sp, turn 

Row 3:
Same as row 1, except the ch sp you work into at the end is a 5 ch sp


and this will be true for all subsequent repeats

Repeat rows 2 and 3 for the length desired ending on a row 2, do not fasten off. 

Bottom finishing row:
ch 4, skip (1 ch, 2 dtr)


*(2 dtr, 1 ch, 2 dtr) in 1 ch sp indicated above, ch 3, skip 2 dtr,


dc in next 1 ch sp indicated above, ch 3, skip 2 dtr, repeat from * moving along the row, ending on (2 dtr, 1 ch, 2 dtr) in 1 ch sp


ch 4, dc in 5 ch sp indicated, fasten off

Top finishing row:


Turn work upside down with yarn tail to your left. Rejoin yarn in 7 ch sp at right hand corner indicated above, leaving a tail long enough to weave in later, ch 4, *skip rest of chs in the ch sp


(2 dtr, 1 ch, 2 dtr) in ch sp indicated above, ch 3, dc in 6 ch sp, ch 3, repeat from * ending with (2dtr, 1 ch, 2dtr)


ch 4, dc in corner st indicated, fasten off. Weave in ends.

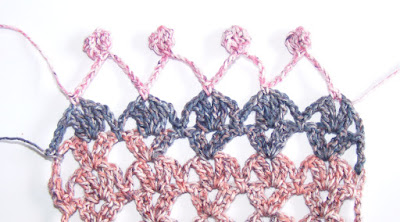
Add a fringe of your choice or you can make the one I did. I originally found the instructions for this bobble fridge via Pinterest on Once Upon a Pink Moon's blog. I thoroughly recommend you go look and see all the things Robin gets up to on her blog, she is a very creative and talented lady. On that website it's written in US terms so I've converted it to UK terms for you here and I have modified it ever so slightly. I'm including a few photographs here to show you exactly how to add it to this scarf.


Step 1 - Rejoin yarn by making a slip knot loop and pulling through the first 1ch sp (indicated above), ch 1, dc in same sp

Step 2 - ch 9, yo, insert hook in 3rd ch, yo, pull yarn through, yo, pull yarn through 2 loops (2 loops on hook) *yo, insert hook into same ch, yo, pull yarn through, yo, pull yarn through 2 loops (3 loops on hook), repeat from * once (4 loops on hook) **

Step 3 - yo, pull yarn through 4 loops, ch 3 (see below for how your work will look)


Step 4 - yo, insert hook into 3rd ch from hook (indicated above), yo, pull yarn through, yo, pull yarn through 2 loops (2 loops on hook), repeat from * to ** twice 


Step 5 - yo, pull through 4 loops. Insert hook into the V of the ch at the bottom of the first bobble indicated below. This has the effect of “folding” the two bobbles on top of each other.

NB It's quite fiddly to do, you will need to wiggle the tip of the hook into each side separately, it is quite tight because of the number of stitches worked into it already.

Step 6 - yo, pull yarn through (2 loops on hook), yo, pull through both loops, ch 6, skip (2 dtr, 3 ch, dc, 3 ch, 2 dtr), dc in 1 ch sp indicated below


Repeat steps 2 to 6 all the way along, ending in final 1 ch sp with dc, fasten off. Repeat the fringe on the other end and then weave in all ends.


The scarf will benefit from blocking, it brings out the lacy stitches beautifully. Drop the scarf in a bowl of tepid water and then very gently squeeze the excess water out (do not wring!) Roll it up in a dry towel to blot out some more. Lay the scarf on fresh dry towels (I needed two laid end to end) over carpet or a blocking board and then pin it out gently, stretching it a little as you go using rustless stainless steel pins. Pay particular attention to the "points" created on the finishing rows by placing a pin in the 1 ch sp, being careful to keep them in a straight line.

Leave to dry overnight and then you can wear it!